Sunday, December 25, 2011

Christmas Treats


Cake pops, cake balls, and chocolate crinkles made for friends and coworkers.

Christmas Cupcakes

Above are cupcakes I made for my son's day care center staff.  Chocolate cupcakes with vanilla buttercream and snowflake fondant.

Above are cupcakes I made for our Christmas Eve get together with friends. Vanilla cupcakes with vanilla buttercream piped as a tree then topped with a star fondant.

Friday, December 16, 2011

Wipeout Cake

 My first baby is turning 12!! I can't believe how time flies so fast :(
I asked him what theme does he want for his cake. He debated between xbox, modern warefare and wipeout. Went back and forth between white almond sour cream cake and red velvet cake. Eventually, he decided to go with WASC and Wipeout. 


For those of you who don't know what Wipeout is, it is a game show that airs on TRU TV. I knew they've been watching this show but I myself don't watch it. So when he asked for this to be the decoration for his cake, I had no idea what to do. So I watched an episode just to give me an idea what I need to put on the cake.


While I was making this, my younger son was watching what I was doing. He had a lot of opinions and ideas on what I should do. So I am giving him credit on the design of this cake. :)

At first I wasn't too keen about the design but in the end I thought it turned out pretty good. So did my birthday boy... and that's what matters.


Thursday, December 15, 2011

Cake in a Jar


Finally done with the Christmas treat for my eldest son's teachers.  Very easy to make and less time than decorating a cupcake.  I baked a (not so red) red velvet cake and a white almond sour cream cake colored in green. Then used a biscuit cutter that fits in the 1/2 pint mason jar I bought. Alternately put in some mascarpone cream cheese frosting, then the red velvet cake, then some more mascarpone cream cheese frosting, then the green wasc cake and finally some vanilla buttercream. Added a ribbon to give it a little decor. Easy!

Camaro Cake

A Camaro cake for my husband's birthday. I am so glad that I had a good head start the weekend before his birthday. I got sick a few days and had to work on this cake in bits and pieces when I am able to. Gladly I felt a lot better the day before his birthday so I was able to finally get everything done. Not as polished as I would like but maybe next time I can get it close to perfect. Hopefully when that time comes I won't get sick anymore. :)
Cake was mocha cake with mocha swiss meringue buttercream. His favorite!

I would like to say thanks to Way Beyond Cakes By Mayen for introducing me to party mini lites on cakes. I wrapped the part of the light that went in the cake with glad press and seal wrap so that it won't actually make contact with the cake. :D


Sunday, December 11, 2011

Choco Crinkles


It's December again... busy busy month for me.  Just dropping this quick blog to share this chocolate crinkles cookies that I always make as one of the gifts for my friends. There are several recipes out there that you can try.  Here's one from allrecipes.com.

Ingredients

  • 1 cup unsweetened cocoa powder
  • 2 cups white sugar
  • 1/2 cup vegetable oil
  • 4 eggs
  • 2 teaspoons vanilla extract
  • 2 cups all-purpose flour
  • 2 teaspoons baking powder
  • 1/2 teaspoon salt
  • 1/2 cup confectioners' sugar

Directions

  1. In a medium bowl, mix together cocoa, white sugar, and vegetable oil. Beat in eggs one at a time, then stir in the vanilla. Combine the flour, baking powder, and salt; stir into the cocoa mixture. Cover dough, and chill for at least 4 hours.
  2. Preheat oven to 350 degrees F (175 degrees C). Line cookie sheets with parchment paper. Roll dough into one inch balls. I like to use a number 50 size scoop. Coat each ball in confectioners' sugar before placing onto prepared cookie sheets.
  3. Bake in preheated oven for 10 to 12 minutes. Let stand on the cookie sheet for a minute before transferring to wire racks to cool.


Sunday, November 13, 2011

Blue Birthday Cake


A simple birthday cake for a friend who celebrated her 25th birthday.  Colored the cake blue since it's her favorite color.  I didn't have much time preparing for this cake thus the simple design. Used the quilting technique and also tried the scallop crimper I bought a long time ago. It was my first time using it so I wasn't quite sure how to gauge it. So I made a mistake trying it out and crimping the edge of the cake directly. A disaster!! So to cover it up, I rolled out fondant and did the crimping on it and attached it to the top and bottom edge. :)


I made a decent looking flower to put it on top. The only regret I have here is I didn't use the script letter cutters.  Oh well! What do you do if you have only a couple of hours to do the cake. hehe.

Anyway, what's important is the celebrant liked it!  Cake was chocolate with vanilla buttercream icing.

Barbie Doll Cake

Finally, I was able to make a doll cake with matching cupcakes.  Another one to check off my "want to do" list of cakes.  Took me a lot of hours to make these but it's so worth it in the end. I love how this cake/cupcakes turned out though I had some mistakes and frustrations while making it. :)


First time to use this kind of baking cups. It's pretty cute but quite expensive.  Not minding the price I went ahead with it since I thought it will look nice and complete the design when put on the stand together with the cake.  And it did!


I made a mistake of putting Barbie in the cake first before covering the skirt with fondant. I was too afraid that if I pull Barbie out that the cake will collapse.  Second mistake was due to me getting impatient... I brushed the dust on the fondant where some of the spots are still wet.  So the dust color didn't blend well and left some dark uneven streaks on some part.  Notice the white flowers by the waist? That's my attempt to cover that mistake. Ugh! But overall I am still happy and pleased how this cake turned out.


Made some butterfly and flower accents for the cupcakes.  I dusted all butterflies and flowers using Wilton's dust color in pink and periwinkle. Also used some blue pearl dust.


Cake was chocolate cake with vanilla buttercream icing. Will definitely do this kind of cake again if and when I get that chance.

Monday, November 7, 2011

Cupcake Stand


Made a cake/cupcake stand for a little girl's birthday party this Saturday.  Mom and little girl requested for flowers and butterflies in colors blue and pink.

I followed this tutorial on how to make this cupcake stand.  Thanks, Baking and Caking for Beginner, for the crafty DIY idea.   And special thanks to my godson for the two empty baby formula cans. :)


Saturday, October 29, 2011

Bachelor's Cake (PG)

 
  It's my second time making this kind of cake but a first to make it a full female torso.  I have confirmed again how much I enjoyed making this kind of cake design.  I made it real simple this time because I didn't have much time getting more decors done as I only knew about making this cake a few days before the event.
 
I dusted the nipples with the combination of pink, peach and brown color dust.
Anyway, I made this for a friend's bachelor's dinner party. It's not really a bachelor's event as the whole gang, wives and children, were there. We got together to wish our friend goodluck and congratulations on his new journey ahead.
 
I made the necklace using melted white chocolate then dusted with gold highlighter dust.

Cake was mocha cake with mocha swiss meringue buttercream. Covered and decorated in marshmallow fondant.  
 
A side story about this cake... I finished it around 1 am the night before the event and around 6 am the next morning my husband woke me up and said "The mocha drink spilled on the cake". What a way to wake somebody up! So without another second to waste I rushed down and opened the fridge and saw the cake to my horror.... "WTH!!" I was so mad I couldn't even say a single word.  Good thing the dinner was not until the evening so I was able to just wipe off the liquid, let it dry and rubbed it to smooth it out again. Whew!

Wednesday, October 19, 2011

Lot of Ribbon Roses


 Made this simple cake for my frequent flyer sister. She also celebrated her birthday earlier this month that's why the cake. She can't complain anymore that I didn't make her cake. :D

 Chocolate cake with vanilla buttercream covered and decorated with marshmallow fondant.  I also tried out the new textured rolling pin my hubby got me for my birthday.

Pumpkin Cake Pop


 Made some pumpkin cake pops as requested by a coworker. They are going to give this away to their son's teachers.


Cake pop flavor was chocolate with chocolate ganache.  Covered in vanilla chocolate melts.  I didn't find a colored orange candy melts so I just got some white vanilla ones and added orange food gel color.  I also added about a few brown milk chocolate to tone the orange color down and mimic the pumpkin color more.


Decorated with fondant leaves and stem. I also brushed a little brown food color to give it a little depth as would a real pumpkin crease.

Saturday, October 1, 2011

Colorful Cake


Yey! Finally after several weeks of not making any cake I've finally done one this week! A colorful cake for a friend on his special day.   I did this cake to match his colorful personality.  Simple yet fun.


Cake was white almond sour cream cake with vanilla buttercream icing. Covered and decorated with marshmallow fondant.  I used wires to hold the fondant balls and put some edible pearls on the letters.


Saturday, September 24, 2011

Banana Walnut Bread


What do you do with over ripped bananas? Of course, turn it into bread so we don't waste it. Good thing I love banana bread. :)

Here's my recipe for a banana bread.
 2 cups all purpose flour
 1 tsp baking soda
 1/4 tsp salt
 2/3 cups brown sugar
 1/2 cup butter
 2 eggs, beaten
 1 tsp vanilla extract
 2 1/2 cups mashed bananas
 1 cup chopped walnuts

- Preheat oven to 350F. Prepare a large loaf pan or 2 smaller loaf pan, grease lightly.
- Stir together all purpose flour, baking soda, and salt. Set aside.
- In a separate bowl, cream together butter and brown sugar.
- Stir in vanilla extract, eggs and mashed bananas until fully incorporated.
- Stir in flour mixture enough to get it wet. Do not over mix.
- Mix in the walnuts.
- Pour batter in prepared loaf pan.
- Bake for 40 to 60 mins.
- Enjoy!
Note: Walnuts you can substitute to any nuts you want or you can eliminate it all together.

P.S. Picture above, I split the batter in two large loaf pan to cut the baking time.. yes I was in a hurry. ;)

Thursday, September 22, 2011

Buko Pie.... Coconut Pie

One of my favorite dessert or snack from home is Buko Pie (Coconut Pie).  When I was back home we usually get this when we go to Laguna province. It's been years since I've eaten this and I am so craving for it. So being the baker in me, I had to experiment and to my delight I was able to improvise and bake my favorite pie ever! :)

For the benefit of my friends and others out there who wants to try to make buko pie, especially those who are overseas, I am sharing the recipe.

 Here's what you need:
2 cups of young coconut, shredded
1/2 cup of young coconut juice
1/2 cup condensed milk
2/3 cup evaporated milk
4 tbsp granulated sugar
1/2 tsp vanilla extract
1/2 cup cornstarch
1/2 cup evaporated milk
2 deep dish pie shells
grated cheese


I got the young coconut from the Oriental store in our area. They do have the fresh coconut but I am too lazy to peel, open, and shred it so I opted for the frozen ones. 2 packages of the frozen shredded young coconut will do.


As for the pie shells, you can make your own from scratch if you have a very good recipe (and would care to share with me) but for easy and less work I bought the frozen pie shells from the grocery store. It comes in two shells per package.


Now how do we do this?  It's very easy!
Preheat oven to 400F.

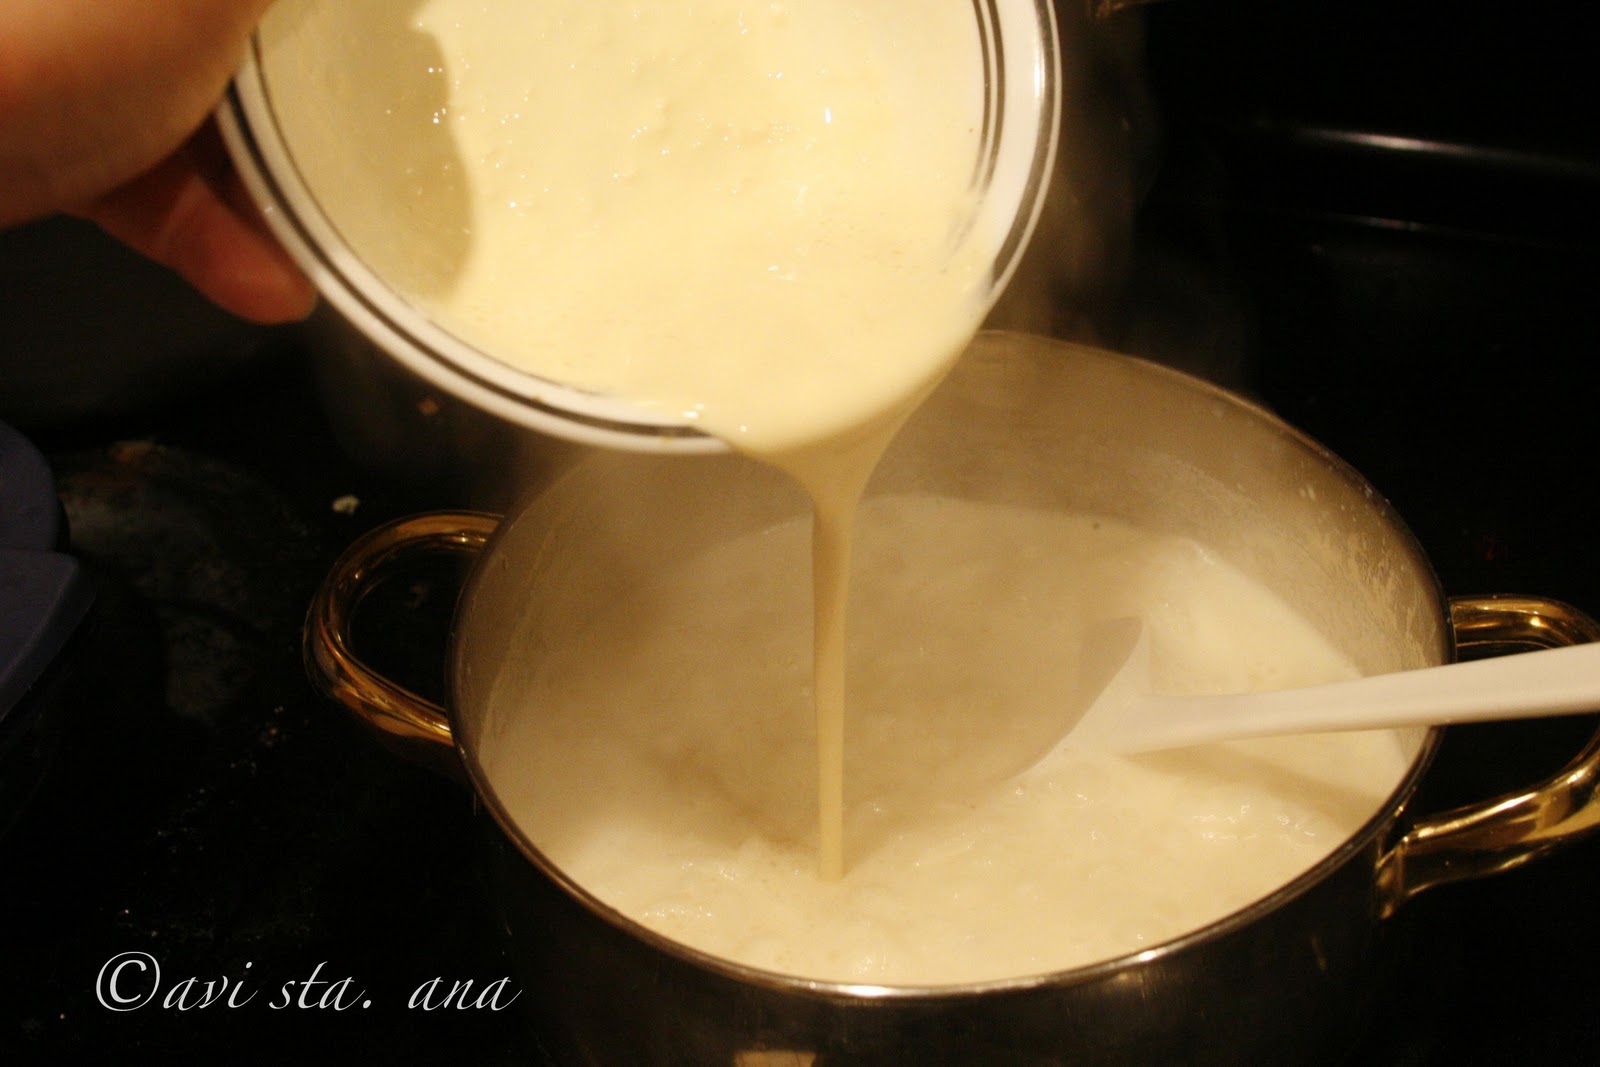
In a small bowl, dissolve cornstarch to 1/2 cup of evaporated milk. Set aside.


 In a medium saucepan over medium heat combine young coconut, coconut juice, condensed milk, evaporated milk, sugar, and vanilla extract.

Make sure to not burn it so you need to watch it and stir occasionally.

Bring to a boil.  Let it boil for about 2 minutes. Stir occasionally.

Pour in the cornstarch/evaporated milk.

The mixture will thicken quickly so constant stirring is a must to avoid burning.
 Remove from heat when mixture is thick and has formed together.

Pour coconut mixture into one of the pie shells.

Even the coconut mixture out to the edges. (Oopps, I overfilled this one!)


Remove the edge of the other pie shell.


Then flip it over to the one that has the filling to cover the pie.

Flatten the top crust and make sure to cover and seal the edges. 
Then put this in the oven and bake for 10 minutes.

After 10 minutes, remove from oven and sprinkle cheese on top.
I say sprinkle but as you can see I almost covered it entirely. It's up to your liking. :)
Put it back in the oven and bake for another 5 to 10 minutes.

Once cheese is melted according to your liking remove from oven and let it cool for 10 minutes.

You can serve the pie warm or chill it for a few hours before serving.   I like it chilled while my husband likes it warm. :)

 I hope you try this recipe and hope that it satisfies your craving for buko pie also.  Enjoy!